Subscription Button Control for ASP.NET Web Form
This page explains the usage and facts about the Subscription button Web Form Server Control. If you intend to use Subscription button within your ASP.NET MVC project, please visit this page. PayPal Subscriptions and Recurring Payments let you accept recurring payments for your service. Our Subscription Button Control is designed to facilitate you to use that PayPal offered service within your ASP.NET Web site in the most organized Object Oriented way. When you set up Subscriptions, you can offer subscribers a trial period, special introductory rates, and a regular rate. Subscribers are billed automatically according to the terms you specify, removing the hassle of keeping track of which payments you have and have not received. PayPal Subscription buttons can also help you improve your buyer experience with customizable buttons, secure payments, and the ability to pre populate your subscribers’ PayPal sign up pages. PayPal provides Instant Payment Notifications to give you instant notification of all subscriptions activities and to facilitate Subscription Password Management.If you are evaluating a Trial Version of this control OR if you want to test with Demo Money, please prepare your Sand Box account before proceeding to this chapter .
In order to keep this page short and simple, the examples are given only in C# language. If you are a VB.NET programmer, please accept our apology. The example snippets are so short and comprehensive that as a programmer you wont have any problem to comprehend.
| - The Checkout Experience - Getting Started | - Set Properties Programmatically - Click Event and Post Back | - Handling Instant Payment Notification (IPN) - Handling PayPal Return / PDT |
- Drag and drop an instance of the Subscription Button control from your Visual Studio Toolbox as shown below:
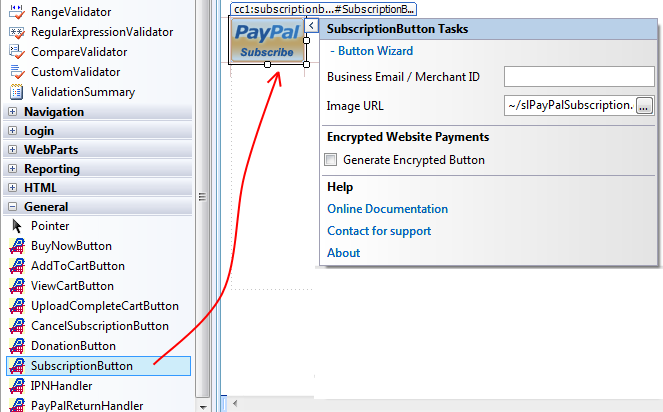
The first property of this control that you need to set is your Business Email Address or Merchant ID of your Merchant Account. If you are testing in Sand Box, then, this is the account which you created as 'Test Merchant Account' as explained in the Sand Box preparation chapter. Please do not get confused with the Developer Central Login account with the Test Merchant Account. Merchant ID is an alternative to using your Email address. It is better not to expose your business email address in order to protect your Email In-box from Spams. You can set either Business Email or Merchant ID from the Smart Tag or from the Property Editor. In order to get your Merchant ID, log in to your PayPal account. If you are testing in Sand-box, then, log in to your Developer Central Account, then log in to your Merchant Test Account from https://www.sandbox.paypal.com/. Click 'Profile' Menu, then, your Merchant ID will be shown up as shown in the following screen shot.

Set the merchant ID as shown here: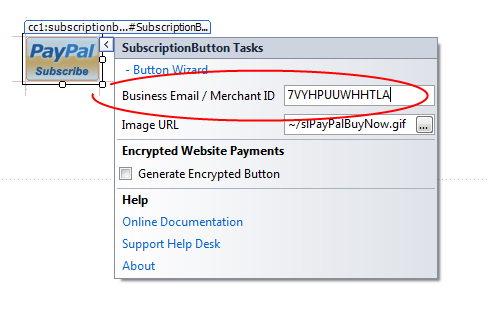
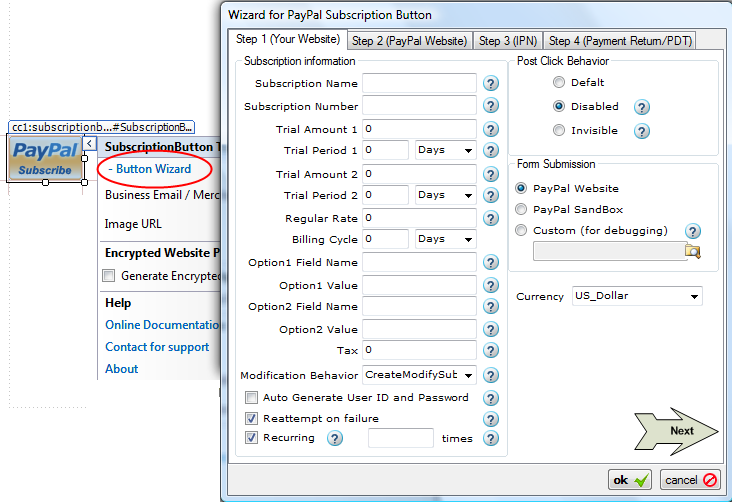
Now you may want to set few more properties like Subscription Name, Billing Cycle, Regular Rate etc and you can do all of these using the Wizard for the button which can be called by clicking the link found in the Smart Tag as shown in the following Screen-shot.
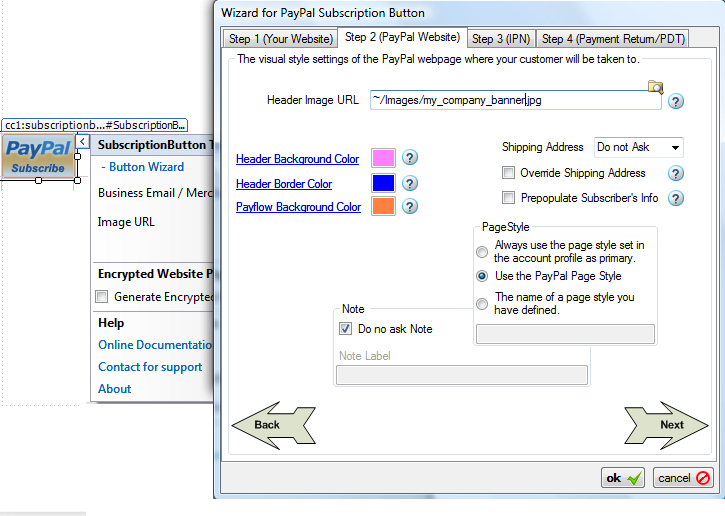
- Furthermore, you may choose to set the visual styles and PayPal page behaviors for the subscription button. Just click the button "Next" shown in the wizard and you will be taken to configure the display page as shown in the following screen-shot.
 Please note: If your account is not upgraded to a Premier or Business account, then, you will not see any affect of these styling properties for PayPal page. For example, if you set a header image URL, you will not see that image when you click the Subscription button and taken to PayPal website. You will see your email address as the header of the page.
- Please note: If your account is not upgraded to a Premier or Business account, then, you will not see any affect of these styling properties for PayPal page. For example, if you set a header image URL, you will not see that image when you are taken to PayPal website due to a click on the Subscription button. In that case, you will see your email address as the header of the page.
- If you want to pass unlimited custom data that you want to track in a Post Payment event like IPN_Subscription / IPN_Payment event, PayPal_Returned, then, please check the feature chapter about Additional Data Items.
Setting Properties Programmatically using the Rich set of API. 
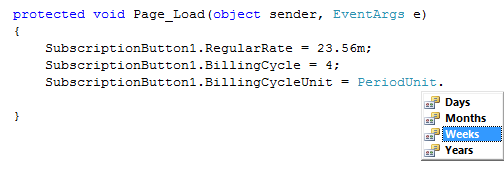
Click Here to view the complete Class Diagram that you may use as a reference when you set properties from your code.
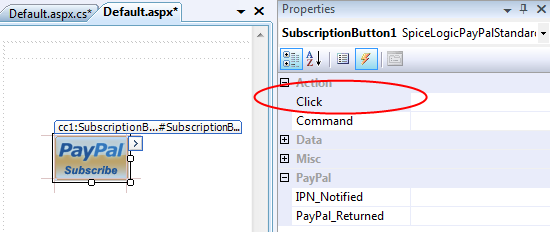
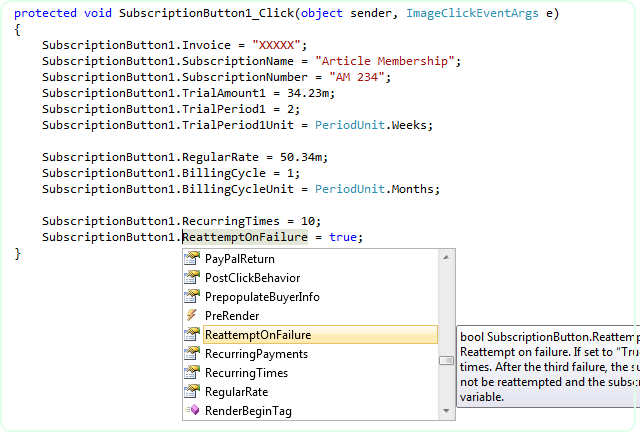
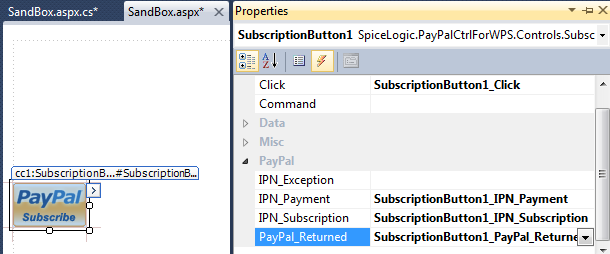
You may want to set the properties of your Subscription Button after the customer has clicked the Button. This control has an event named "Click". It is similar to any standard ASP.NET button control's Click Event as shown in the following figure:
If you attach an event handler to this event, then the event handler method will be executed before the data is transferred to PayPal.
You can use Validation logic inside the Click Event handler of a Subscription button and based on a condition (user input) you can cancel the submission to PayPal. Please check the method CancelSubmission().
- The Subscription Button will POST BACK only IF the Click event is handled. If you do not handle Click event, your customer will be taken to PayPal website directly from the Client Side without any Server Round Trip.
Handling Instant Payment Notification (IPN) from PayPal:
When your customer Clicks the final 'Agree' button in the PayPal website, PayPal sends notification to your website asynchronously which is called Instant Payment Notification (IPN). 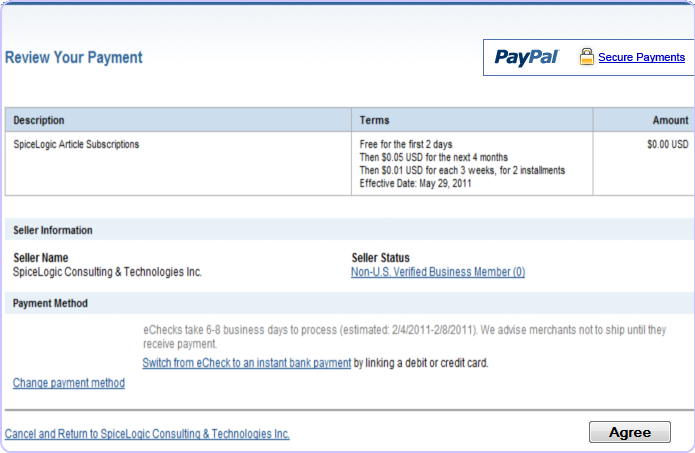
Not only when the Agree button is clicked, PayPal submits IPN when:
- Payments are first made, with a status of completed or pending.
- Payments clear, fail, or are denied, if the initial status was pending.
- Subscriptions begin, end, or are canceled, if you use Subscriptions Password Management.
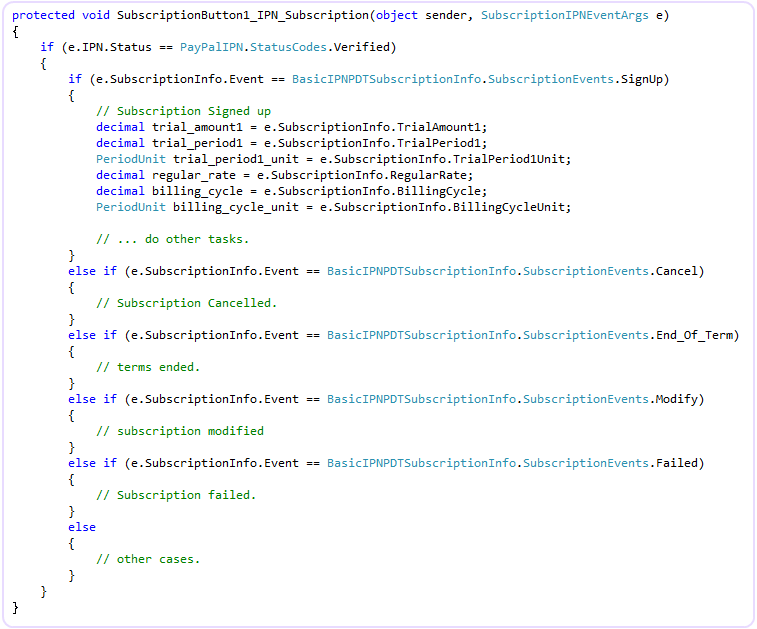
This control can capture that notification and fire a server side event named IPN_Subscription. This control not only just fires the event, but also collects all the transaction data from IPN and offers you a rich set of strongly typed relational object model as event argument object which is not only loved by all Object Oriented Programmers, but also revealing all the headaches from the developer about verification and other complex tasks in IPN Session. 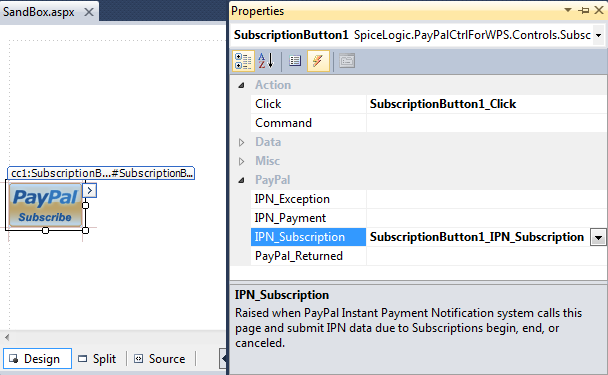
Click Here to view the complete Class Diagram of SubscriptionIPNEventArgs object.
- Unless a payment is made, Transaction ID will not be available. For tracking Subscription, you should use the property e.SubscriptionInfo.SubscriberID.
Handle the IPN_Payment event so that you can get notified whenever Payment is made for a Subscription.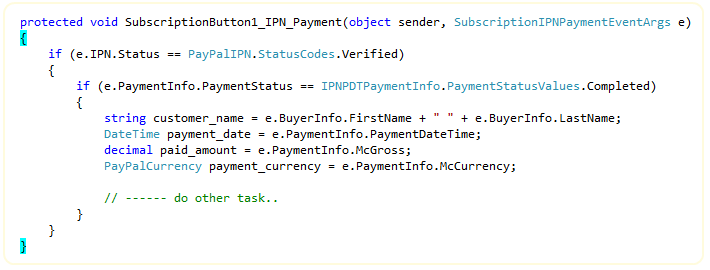
- Click Here to view the complete Class Diagram of SubscriptionIPNPaymentEventArgs object.
By the way, the above example snippet does not show the detailed way of handling FRAUD attempts in order to simplify the overview of IPN_Subscription / IPN_Payment events. So, you should check the pattern for payment verification, fraud detection and automated Product delivery.
If you do not want to handle IPN_Subscription / IPN_Payment events from the same page, rather if you want to handle IPN_Subscription / IPN_Payment events from a dedicated page, you can do that too. Simply do not handle IPN_Subscription / IPN_Payment events and set the Custom Notification URL from the Design Time Smart Tag Wizard -> Step 3 as shown here:

- If you use a Custom IPN URL to capture the IPN from a dedicated page, you can still get the benefit of firing IPN_Subscription / IPN_Payment events and capture all IPN data from event argument object from that dedicated page. How ? Please check the chapter for IPNHandler Component.
If you handle any of the IPN_Subscription / IPN_Payment events, setting Custom Notification URL will have NO EFFECT. The control will always generate notify URL automatically to use the same page where the Subscription button is hosted so that the same Subscription button can fire IPN_Subscription / IPN_Payment events.
If you do not handle any of the IPN_Subscription / IPN_Payment events and if you do not set any Custom Notification URL then, this control will not capture IPN at all. If you have specified any default IPN URL in your PayPal profile, then, PayPal will use that URL to send IPN for any transaction happens in your PayPal account in that case.
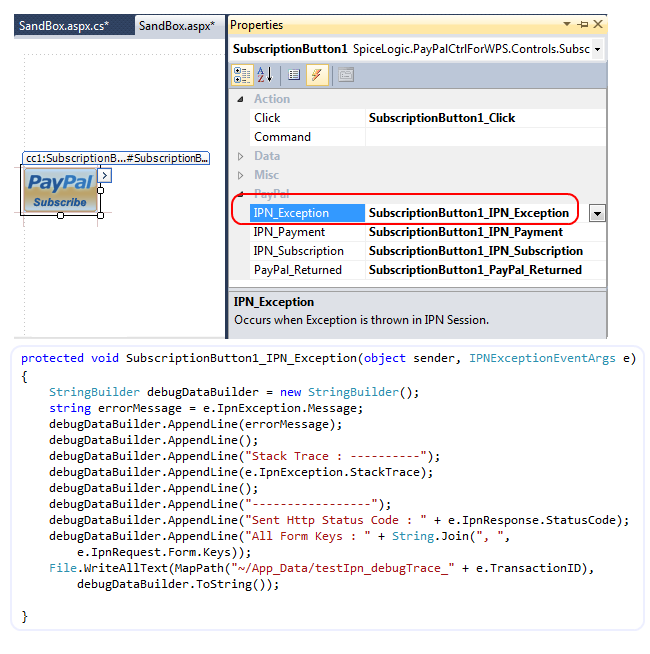
You should handle IPN_Exception event if you want to capture any Exception thrown in your IPN_Subscription / IPN_Payment events handler method. By handling IPN_Exception event, you not only catch any exception that was fired beyond your IPN_Subscription / IPN_Payment events handler layer, but also you get rid of using TRY - CATCH block in your IPN_Subscription / IPN_Payment events handler which will enhances the readability of your code.
You do not need to turn IPN option ON from your PayPal account at all. This control will take care of everything for you.
Whenever your customer is transferred back to your website from PayPal website after completing or canceling the subscription, you can do additional tasks on your website by handling an event named PayPal_Returned. This control not only just fires the event, but also collects all the transaction data from PayPal if you have turned 'Payment Data Transfer' option ON from your PayPal profile. The event argument object of PayPal_Returned event offers you a rich set of strongly typed relational object model same like the event argument object of IPN_Subscription / IPN_Payment events. This event will take care of notification validation so you just do not need to worry about any dirty code work, rather use the clean data returned by this event argument object.
Once you handled PayPal_Returned event of your Subscription button, your buyer will be taken back to your website after the subscription is started or canceled to sign up. You can check from your Event handler if the subscription was proceeded or canceled as shown below: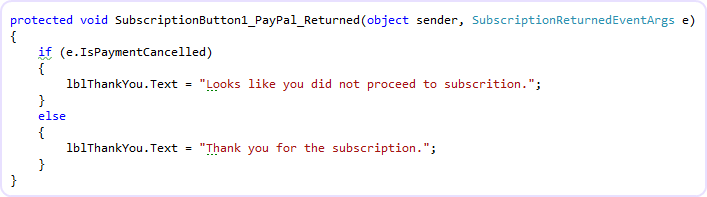
If you do not handle PayPal_Returned event, then, your subscriber will not be returned to your website by PayPal. So, you should handle this event if you want to bring your subscriber back to your site.
If you want to redirect your subscriber to a different page after returning from PayPal, you can do so by setting the Custom Completed Return URL and Custom Canceled Return URL from the Step 4 tab of the Subscription button Design Time Wizard as shown here:
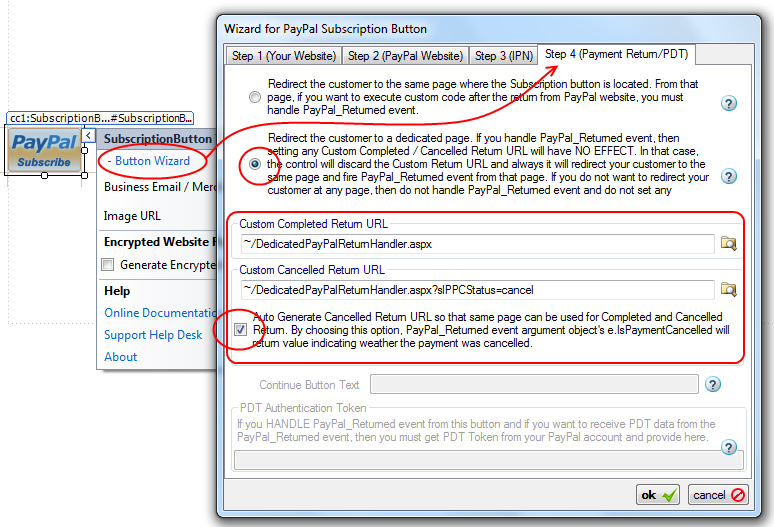
Notice the check box in the above screen shot. If you check this box, then, the Canceled Return URL will be auto generated so that you can handle both of the Completed and Canceled Return event from the same page. It is HIGHLY RECOMMENDED that you check this option.If you prefer to use Custom Return URL as mentioned above, you can still fire PayPal_Returned event and collect the information about completed/canceled from your dedicated return page. How ? please check the chapter for PayPalReturnHandler Component.
- If you handle PayPal_Returned event, then, setting Custom Complete Return URL and Custom Canceled Return URL will have NO EFFECT. So, if you want to redirect the subscriber to a dedicated page after PayPal return, then, make sure that you do not handle PayPal_Returned event and then, set the Custom Complete Return URL / Custom Canceled Return URL.
If you want to receive all the transaction data in PayPal_Returned event as you could in IPN_Subscription / IPN_Payment events from SubscriptionReturnedEventArgs, then, you need to turn 'Payment Data Transfer (PDT)' option On from your PayPal account. Once you turn PDT ON for your PayPal account, you will receive an Authentication Token which is called 'PDT Authentication Token'.
Once you get the PDT Authentication Token, from the design time smart tag, click Button Wizard and select the last tab "Step 4 (Payment Return / PDT)". In that tab, at the bottom of the Form, you will find the box for PDT Authentication Token. Set the PDT Authentication Token in that box as shown here: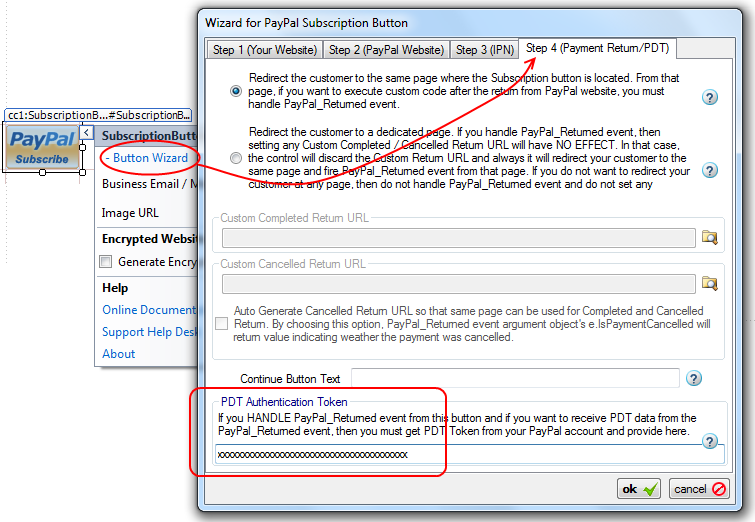
After PDT Authentication Token is set, you can collect transaction data from the PayPal_Returned event argument object SubscriptionReturnedEventArgs.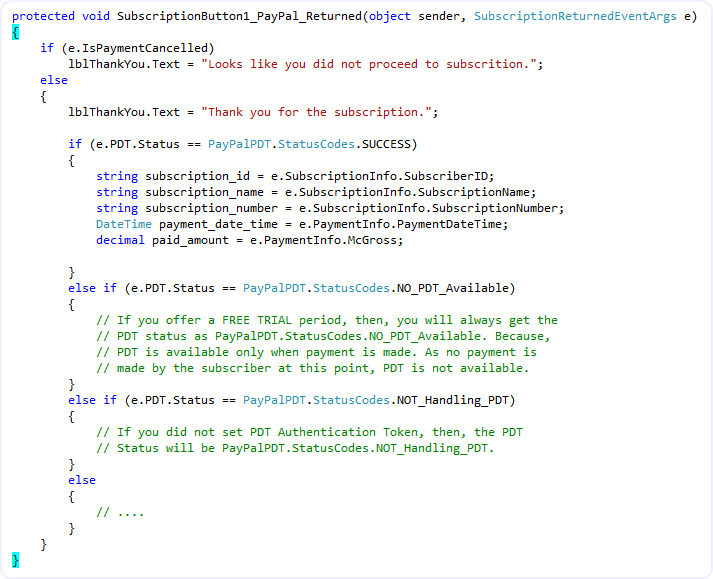
Click Here to view the complete Class Diagram of SubscriptionReturnedEventArgs object.
- You do not need to enable PDT if you just need to collect Transaction ID from PayPal_Returned event. e.TransactionID is available even though if you do not set PDT Authentication token. But, Transaction ID is available ONLY IF a payment is made. If you offer FREE Trial period, then, there will be no payment made at the subscription sign up and so, Transaction ID will not be available. For tracking Subscription, you should use the property e.SubscriptionInfo.SubscriberID.
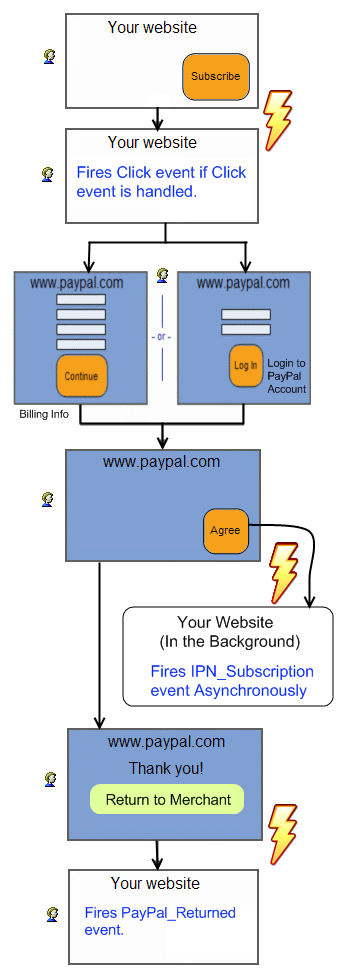
So, PayPal_Returned event is fired after IPN events, is that right ?Answer : Not strictly but usually. What does it mean ? Ok, as I said, IPN is submitted to your website by PayPal Notification Service. It actually queues the notification task to it's Queue and depending on the tasks the notification service already has, the time when 'IPN event fire' varies. For the PayPal live site, the notification service task queue is not usually long but the task queue for PayPal Sand box is usually very long. So, when testing in Sand box, most of the time, you will find that your subscriber is already back to your website (PayPal_Returned event fired) before IPN events are fired. But, when you are testing in PayPal live site, most of the time you will find that, IPN events are fired before your subscriber is back to your website (PayPal_Returned event fired). Please remember, PayPal_Returned event is Synchronous and IPN events are Asynchronous. One event does not depend on the completion of another event.
Trial Version Alert:If you already have obtained a License Key and set the License Key from the design mode Smart Tag then you are ready to use the Subscription button from PayPal Website. If you did not set the License Key yet, clicking the Subscription button will take your customer to PayPal Sand Box.
You should take appropriate measures to protect against Fraud Attempts.
Consider the IPN_Subscription / IPN_Payment events as a pure Service Events, do not perform any task that directly interacts with User Interface Controls, Session Variables, Cookies, ViewState etc. When these events are fired, your customer wont see any effect of these events. For example, if you want to set Text of a Label Control 'Thank you for your Payment' in this event, your customer will never see that. Why ? Because, your customer is not directly responsible for firing these events, rather, PayPal Notification Service fires these events in background thread. For that reason, this control Suppresses all HTML that could be rendered to the Event firer (PayPal Notification Service). Also, this control will STOP firing the Page_Load event of the hosting page. WHY ? Maybe you placed some code in your Page_Load event that directly interacts with Session Variables, Cookies etc or time consuming tasks like Executing lengthy SQL queries which is unnecessary or sometimes harmful for IPN session. So, this control will bypass Page_Load event in the IPN Session. But if you want to let this control fire the Page_Load event in the IPN session because you want to set IPN Settings programmatically from the Page_Load event, then, you have that option too. Set "PayPalIPN.EnablePageLoadEventInIPNSession = true" from the property editor and then, Page_Load event will be fired before IPN_Subscription / IPN_Payment events, but you need to be very careful about using Page_Load event in this case.
If you are testing your web site from "Local Host" then IPN_Subscription / IPN_Payment events wont get fired. Because, IPN is activated by a notification service from PayPal, not directly by your customer. So, when the Subscription button submits all the information to PayPal website as a result of 'Click' on the button, PayPal captures the URL of the page where the Subscription button is hosted. When you test from your local host, the URL of the page where the Subscription button is hosted contains 'local host' or '127.0.0.1' and that URL is collected by PayPal so that it can notify as soon as the payment is made. Naturally that URL is not accessible from any other client/website/service other than anyone who is testing from your PC. So, if PayPal submits IPN to your URL with 'local host'/127.0.0.1 your website wont know about it and so this Subscription button will fail to fire IPN_Subscription / IPN_Payment events. The story is not end here. Whenever, PayPal IPN service Fails to get HTTP '200 OK' status from your Website as as result of IPN posting, the service will keep trying to post to the same URL again after few hours and it will keep trying for a certain period until it gets HTTP '200 OK' result from your website. That is bad for PayPal as PayPal's resource is being wasted. So, PayPal can disable the IPN for your account which is bad for you. In order to avoid that problem, this control will detect if the test website is from 'local host' or not. If it is from local host, then, it will NOT pass any IPN information to PayPal so that, PayPal wont submit IPN to your website. By the way, if you do not handle IPN_Subscription / IPN_Payment events and specify a Custom IPN URL then the logic is little different. In that case, the control will check if the Custom IPN URL is a relative URL or not. If it is a relative URL and if you are testing from local host, that means, the final URL would be an URL with 'local host'. So, in that case, the control will not generate any IPN information so that PayPal wont submit IPN. But if your Custom IPN URL is an absolute URL which does not contain 'local host' or '127.0.0.1' then, the Subscription button will pass IPN information to PayPal so that PayPal can submit IPN. In any case, if the control does not pass any IPN information to PayPal, then, PayPal will check if you have specified any default IPN URL in your PayPal profile. If so, then, PayPal will submit IPN to that default URL in these cases. But whenever you upload your test website to a production server where the hosting page of Subscription button has a REAL accessible URL, then, IPN_Subscription / IPN_Payment events will be fired as usual.
Membership users, please note:
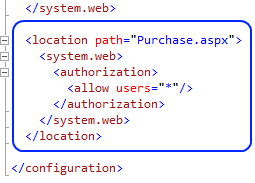
If you are using ASP.NET Membership feature in your website, then, you need to allow PayPal to see your page where you placed your IPN_Subscription / IPN_Payment event handler code. That means, if you are handling IPN_Subscription / IPN_Payment events right from your Subscription button, then, the page that hosts your Subscription button should be visible to all. If you are Handling IPN from a dedicated page then, your IPN handler page should be accessible to all users. Assume that you hosted your Subscription button at "Purchase.aspx" page where "Purchase.aspx" page is located in a private folder (Not visible to everyone). Then, you need to add the following section to you web.config file which is located in that private folder.
If you placed your 'Purchase.aspx' page in a public folder then you do not need to worry about setting the above config unless you explicitly blocked the 'purchase.aspx' page from public.
If you do not permit PayPal to post IPN to your page, then, you will find that IPN_Subscription / IPN_Payment events are not being fired.
By this time, I hope you already realized that, IPN is a different SESSION created by PayPal for your website and this SESSION is not the same SESSION created by your customer at your website. Since any asp.net designer wanting to set up a site where users pay a membership fee to join, would very likely want to put a user in a Role on IPN_Subscription / IPN_Payment event handler methods. It will be a common mistake if you assume that the Customer is logged in as a member in the IPN SESSION. So, how would you pass the user-name of the Customer to the IPN_Subscription / IPN_Payment events so that you can write code to add your customer in a paid member role by the customer's user name ? Yes, we have designed a very special property named "Additional Data Items". This is a Dictionary type property which can be populated either in design time or programmatically. So, you can pass your customer's user-name by Additional Data Items to the Payment Button and you can access that data right from IPN_Subscription / IPN_Payment events handler method. Once you retrieve that user name of the customer from Additional Data Item, you can add him/her to your paid member role. In order to learn about Additional Data Items, please visit this page .
If you do not have Full Trust configuration in your ASP.NET Web site, then, when handling IPN_X event, you will always get e.IPN.Status = PayPalIPN.StatusCodes.CommunicationError from the IPN_X event arg. Because, IPN Status value is returned after the component tries to communicate with the PayPal notification service in the background by HttpWebRequest class. HttpWebRequest class needs Full Trust configuration. In order to use PDT, you must have Full Trust configuration in your ASP.NET website, otherwise you will always get e.PDT.Status = PayPalPDT.StatusCodes.Communication_Error from PayPal_Returned event. Because, prior to firing PayPal_Returned event, the control communicates with PayPal website in the background to verify the transaction using a method from WebClient class. Web Client class methods require Full Trust configuration. If you do not have full trust configuration, you cannot use the PDT feature even manually coding by yourself or using any other technique at all.