Add to Cart Button for ASP.NET MVC
This chapter explains the usage and facts about Add-to-Cart for ASP.NET MVC. If you want to learn about the Web Form Control, please visit this page.
When you have multiple types of products available for sell from your website, you have 2 options. Either you can use PayPal hosted shopping cart OR you can use your own shopping cart and finally upload the items of your own shopping cart to PayPal hosted shopping cart programmatically in a single step. If you do not want to spend effort for building your own shopping cart, then, using PayPal hosted shopping cart can be a good choice, specially when you got the SpiceLogic PayPal Control for Website Payments Standard. Whenever your customer clicks the 'Add to Cart' button, the Item is uploaded to PayPal hosted shopping cart and your customer is taken to PayPal 'View Cart' page. From that 'View Cart' page, your customers have option to come back to your website for shopping (adding more items to the PayPal cart) OR proceed to 'Check Out' page.
If you want to use your own shopping cart and finally upload your shopping cart items to PayPal hosted shopping cart programmatically, then, Upload Complete Cart button is the control you are looking for.
| - The Checkout Experience - Getting Started | - Handling Instant Payment Notification (IPN) - Handling PayPal Return / PDT |
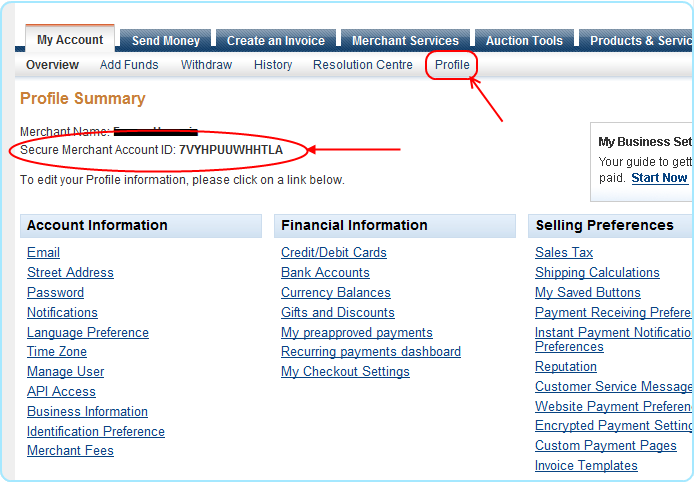
The first property of this component that you need to set is your Business Email Address or Merchant ID of your Merchant Account. If you are testing in Sand Box, then, this is the account which you created as 'Test Merchant Account' as explained in the Sand Box preparation chapter. Please do not get confused with the Developer Central Login account with the Test Merchant Account. Merchant ID is an alternative to using your Email address. It is better not to expose your business email address in order to protect your Email In-box from Spams. You can set either Business Email or Merchant ID from the Smart Tag or from the Property Editor. In order to get your Merchant ID, log in to your PayPal account. If you are testing in SandBox, then, log in to your Developer Central Account, then log in to your Merchant Test Account from https://www.sandbox.paypal.com/. Click 'Profile' Menu, then, your Merchant ID will be shown up as shown in the following screen shot.
Import the namespace "SpiceLogic.PayPalCtrlForWPS.Controls" and create an instance of the component 'AddToCartButton', set the properties and finally call the method RenderForMVC(). You can do that either in your Controller's Action method or in your View page.
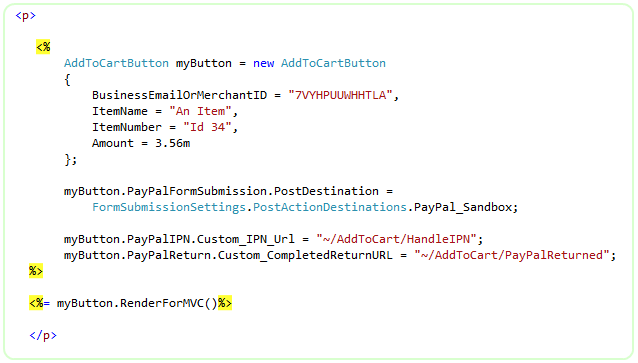
- Please note, how the IPN and PayPal Return URL are set in the above snippet. We have used the Controller Name and Action Method Name for IPN and PayPal Return. We will discuss about IPN and PayPal Return in the following section. If you want to pass unlimited custom data that you want to track in IPN and PayPal return scenario, please check the feature chapter about Additional Data Items.
Click Here to view the complete Class Diagram that you may use as a reference when you set properties from your code.
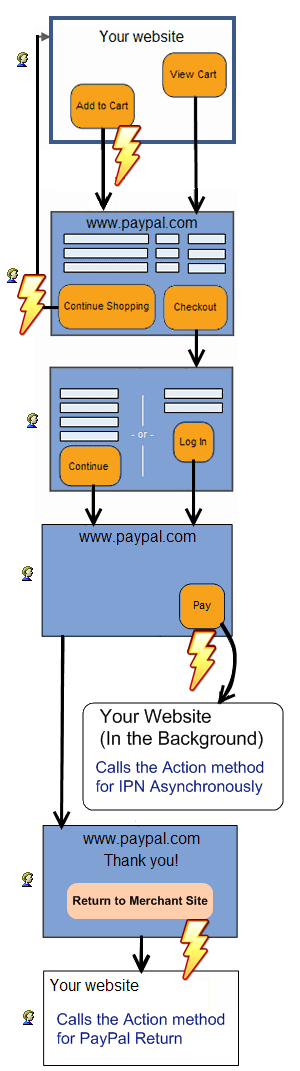
Handling Instant Payment Notification (IPN) from PayPal: When your customer finishes adding all of his desired products to his shopping cart and proceeds to check out page, a 'Pay Now' button is shown as shown in the following screenshot. When your customer Clicks the 'Pay Now' button in the PayPal website, PayPal sends notification to your website asynchronously which is called Instant Payment Notification (IPN).
  As soon as the IPN is notified to your server, the Action Method you defined by the property PayPalIPN.Custom_IPN.Url will be called. In your Action method, you can instantiate an instance of the component IPNHandler and call its method GetShoppingCartDataForMVC. This method will return all the transaction data from IPN and offer you a rich set of strongly typed relational object model. You should import the namespaces "SpiceLogic.PayPalCtrlForWPS.Controls" and "SpiceLogic.PayPalCtrlForWPS" in your Controller Class.
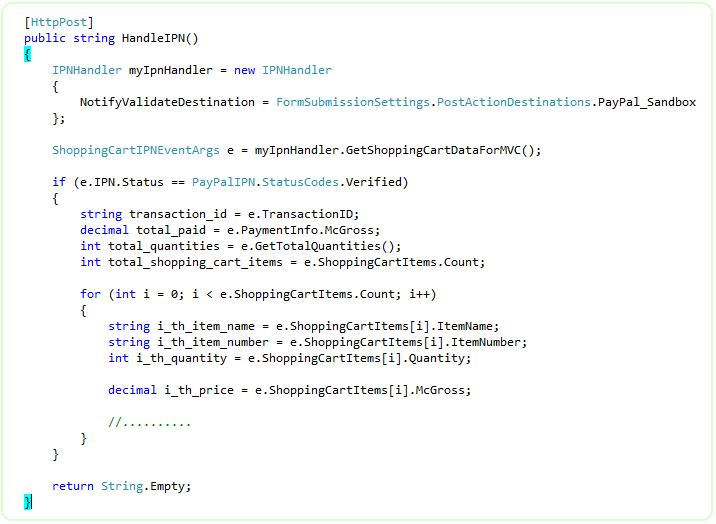
Click Here to view the complete Class Diagram of ShoppingCartIPNEventArgs object.
When IPN_Notified event is fired, your customer wont see any effect of this event. So, do not return any View other than Empty String from the action method for IPN handler.
By the way, the above example snippet does not show the detailed way of handling FRAUD attempts in order to simplify the overview of IPN_Notified event. So, you should check the pattern for payment verification, fraud detection and automated Product delivery.
You do not need to turn IPN option ON from your PayPal account at all. This control will take care of everything for you.
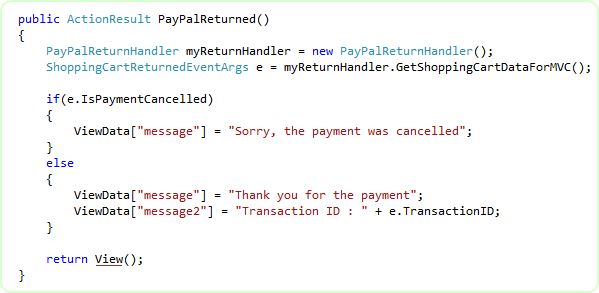
Whenever your customer is transferred back to your website from PayPal website after completing or canceling a payment, you can execute post payment business logic. If you have defined a PayPal Return URL property (as shown in the first screen-shot) in your Add-to-Cart button, then the PayPal Return URL will be called. The Action method we used (shown in the first screen-shot) for PayPal Return was "PayPalReturned" which is defined in the controller "AddToCartController". So, the PayPalReturned Action method will be invoked as soon as the donor is taken back to your site from PayPal website. In this action method, you can instantiate the class PayPalReturnHandler and call the method "GetShoppingCartDataForMVC()". This method will collect all the transaction data from PayPal if you have turned 'Payment Data Transfer' option ON from your PayPal profile. You should import the namespaces "SpiceLogic.PayPalCtrlForWPS.Controls" and "SpiceLogic.PayPalCtrlForWPS" in your Controller Class.
If you do not set any value for the property "PayPalReturn.Custom_CompletedReturnUrl" then your buyer will not be returned to your website from PayPal.
If you want to receive all the transaction data in the PayPalReturned action method from the ShoppingCartReturnedEventArgs object, then, you need to turn 'Payment Data Transfer (PDT)' option On from your PayPal account. Once you turn PDT ON for your PayPal account, you will receive an Authentication Token which is called 'PDT Authentication Token'.
Once you get the PDT Authentication Token, you should set the property for PDT Authentication Token. Please follow the following snippet to find out how this PDT Token is set and all Transaction data is collected.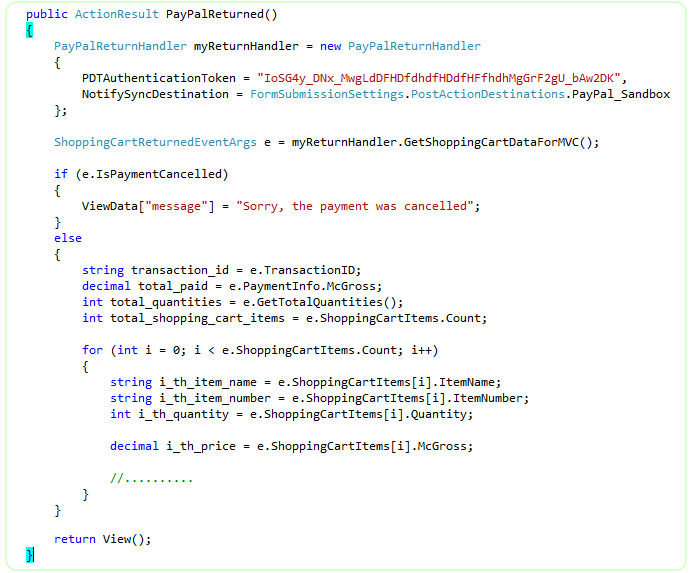
Click Here to view the complete Class Diagram of ShoppingCartReturnedEventArgs object.
- You do not need to enable PDT if you just need to collect Transaction ID from PayPal_Returned event. e.TransactionID is available even though if you do not set PDT Authentication token.
You may also want to place a View Cart Button which will take your customers to the PayPal Shopping Cart showing the added item.
So, PayPalReturned action method is called after HandleIPN action method, is that right ?Answer : Not strictly but usually. What does it mean ? Ok, as I said, IPN is submitted to your website by PayPal Notification Service. It actually queues the notification task to it's Queue and depending on the tasks the notification service already has, the time varies. For the PayPal live site, the notification service task queue is not usually long but the task queue for PayPal Sand box is usually very long. So, when testing in Sand box, most of the time, you will find that your customer is already back to your website (PayPalReturned action method is called) before IPN is Notified. But, when you are testing in PayPal live site, most of the time you will find that, IPN is Notified before your customer is back to your website (PayPalReturned action method is called). Please remember, PayPalReturned action method call is Synchronous and IPN action method call is Asynchronous. One event does not depend on the completion of another event.
A piece of advice : Never process the post payment logic (i.e. logging the transaction data in your database, verifying the payment and generating License Key, sending email to the payer with shipping information etc) from PayPalReturned action method even though you can collect all transaction data from PDT. Because, if the payer closes his / her browser while living in PayPal website before coming back to your website, then, PayPalReturned action method will never be called and you will miss that transaction. Always use IPN handler action method for processing post payment logic. Use PayPalReturned action method to convey 'Thank you' Message or doing some additional Read-Only tasks. What is a Read Only task ? Read Only task means, "the task that can be done by reading your database without writing / updating the database". Get the Transaction-ID from the PayPalReturned action method, query your database using that Transaction-ID and find out if any information is already recorded by IPN handler action method. If found, show the download link / shipping information etc from your database.
Trial Version Alert:If you already have obtained a License Key and set the License Key, you are ready to accept payments from your customers using the 'Buy Now' button from PayPal Website. If you did not set the License Key yet, clicking the 'Buy Now' button will take your customer to PayPal Sand Box.
You should take appropriate measures to protect against Fraud Attempts.
If you are testing your web site from "Local Host" then IPN handler action method wont get called. Because, IPN is activated by a notification service from PayPal, not directly by your customer. So, when the Buy Now button submits all the information to PayPal website as a result of 'Click' on the button, PayPal captures the URL of the page where the Buy Now button is hosted. When you test from your local host, the URL of the page where the Buy Now button is hosted contains 'local host' or '127.0.0.1' and that URL is collected by PayPal so that it can notify as soon as the payment is made. Naturally that URL is not accessible from any other client/website/service other than anyone who is testing from your PC. So, if PayPal submits IPN to your URL with 'local host'/127.0.0.1 your website wont know about it and so this Buy Now button will fail to fire IPN_Notified event. The story is not end here. Whenever, PayPal IPN service Fails to get HTTP '200 OK' status from your Website as as result of IPN posting, the service will keep trying to post to the same URL again after few hours and it will keep trying for a certain period until it gets HTTP '200 OK' result from your website. That is bad for PayPal as PayPal's resource is being wasted. So, PayPal can disable the IPN for your account which is bad for you. In order to avoid that problem, this control will detect if the test website is from 'local host' or not. If it is from local host, then, it will NOT pass any IPN information to PayPal so that, PayPal wont submit IPN to your website. By the way, if you do not handle IPN_Notified event and specify a Custom IPN URL then the logic is little different. In that case, the control will check if the Custom IPN URL is a relative URL or not. If it is a relative URL and if you are testing from local host, that means, the final URL would be an URL with 'local host'. So, in that case, the control will not generate any IPN information so that PayPal wont submit IPN. But if your Custom IPN URL is an absolute URL which does not contain 'local host' or '127.0.0.1' then, the Buy Now button will pass IPN information to PayPal so that PayPal can submit IPN. In any case, if the control does not pass any IPN information to PayPal, then, PayPal will check if you have specified any default IPN URL in your PayPal profile. If so, then, PayPal will submit IPN to that default URL in these cases. But whenever you upload your test website to a production server where the hosting page of Buy Now button has a REAL accessible URL, then, IPN handler action method will be called as usual.
Membership users, please note:
If you are using ASP.NET Membership feature in your website, then, you need to allow PayPal to see your Action Method for IPN handler. So, never apply member constraint on the IPN handler action method.
By this time, I hope you already realized that, IPN is a different SESSION created by PayPal to your website and this SESSION is not the same SESSION created by your customer to your website. Since any asp.net designer wanting to set up a site where users pay a membership fee to join, would very likely want to put a user in a Role on IPN handler action method. It will be a common mistake if you assume that the Customer is logged in as a member in the IPN SESSION. You can pass your customer's user-name by Additional Data Items property and you can access that data right from IPN handler action method. Once you retrieve that user name of the customer from Additional Data Item, you can add him/her to your paid member role. In order to learn about Additional Data Items, please visit this page.