Handling Payment Data Transfer (PDT) & Return from a dedicated Web Form.
The PayPalReturnHandler component is designed for the scenario where you want to use a dedicated page for handling the Return from PayPal instead of handling the PayPal_Returned event of the same button. If you handle the PayPal_Returned event directly from your Payment Button (BuyNow button, Donation button etc) then, you do not need this component at all.
In order to associate a PayPalReturnHandler component with a PayPal Return event caused by a Payment Button (i.e. BuyNow Button, Donation Button etc..) that is hosted in a different page, you need to follow the following steps:
(The example is shown for a BuyNow button, but the same procedure works for all other button controls)
- In the design mode of a BuyNow Button, open the smart tag wizard and go to the tab named "Step 4 (Payment Return/PDT) as shown in the following screen shot. Check the 2nd option and provide the relative path of the dedicated PayPal return handler files.
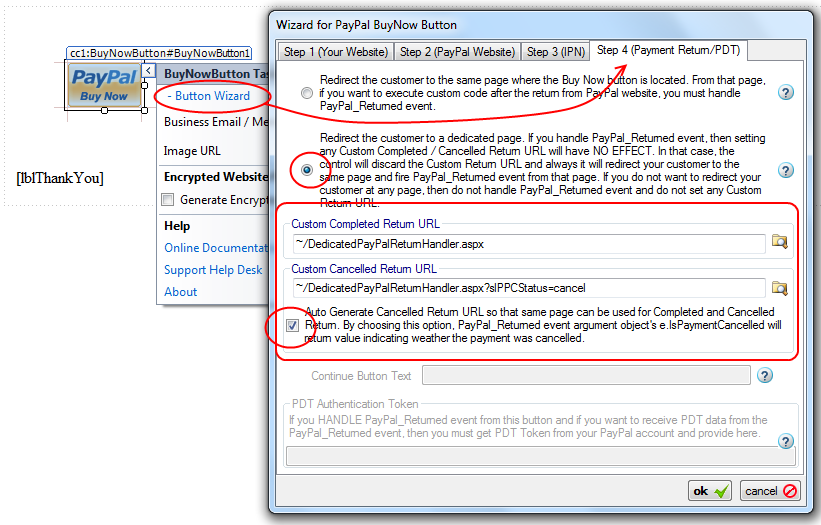
- Once you have done so, you know that, "~/DedicatedPayPalReturnHandler.aspx" is the page which will be called by PayPal after a successful transaction. So, you should place an instance of the PayPalReturnHandler component in this web form. Please note, we did not use a different page for Canceled payment return URL as it is more manageable to use a single page for both "completed payment URL" and "canceled payment URL". You can differentiate these two action by a special query string "slPPCStatus=cancel". What is the purpose of this query string ? This query-string can be recognized by the PayPalReturnHandler as a canceled payment and then it will generate strongly typed property to notify you that the payment was canceled. We will explain this after few paragraphs.
- Now, create an aspx page named "DedicatedPayPalReturnHandler.aspx" and place an instance of the PayPalReturnHandler component as follows:
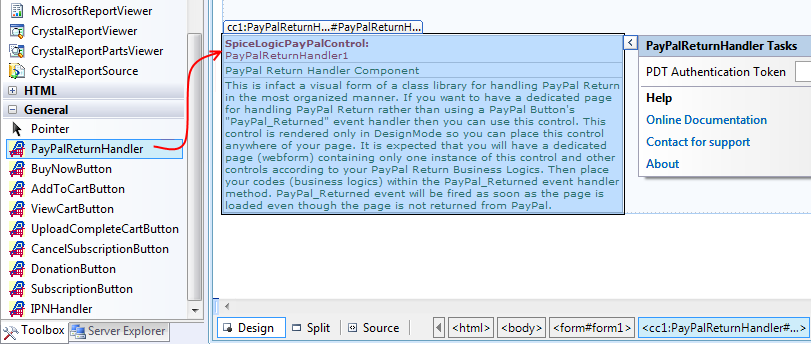 The "PayPal_Returned" event of the PayPalReturnHandler component will be fired as soon as the page is loaded (returned from PayPal). You should place only one instance of this control in an web form (aspx page). Because, if you place multiple instances, all instance's PayPal_Returned event will be fired as soon as the page is loaded which is not an expected scenario at all.
 -
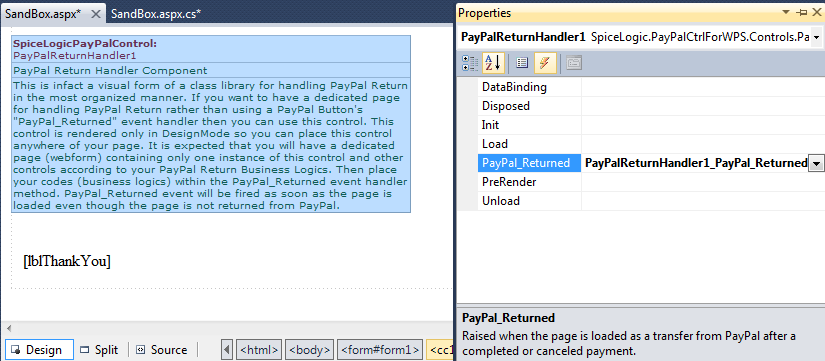
Once you have placed an instance of this component into your web form, attach an event handler method for the event "PayPal_Returned". This event handler method is the method which will contain your business logic.
 Please note: In the above snippet, we used a statement if(e.IsPaymentCancelled) { .. }. You may ask, "how the component knows if the payment was canceled or not !". Remember that, we used a special query string "slPPCStatus=cancel" appended to the "~/DedicatedPayPalReturnHandler.aspx" in step 2. The component checks for the special query string "slPPCStatus=cancel" and if it finds that query string, it sets e.IsPaymentCancelled = true.
Accessing Additional Data Items:
You can access the additional data items as shown in the following snippet :
 By default, the temporary folder used for storing additional data items
is "~/App_Data/". Because, usually this folder is privileged with WRITE
permission. You could change that path from the property
'InternalSettings.TemporaryFolder" as shown below:
By default, the temporary folder used for storing additional data items
is "~/App_Data/". Because, usually this folder is privileged with WRITE
permission. You could change that path from the property
'InternalSettings.TemporaryFolder" as shown below:
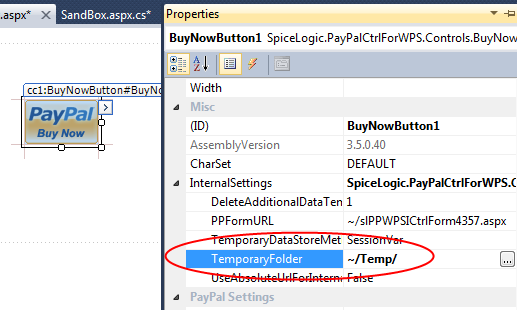
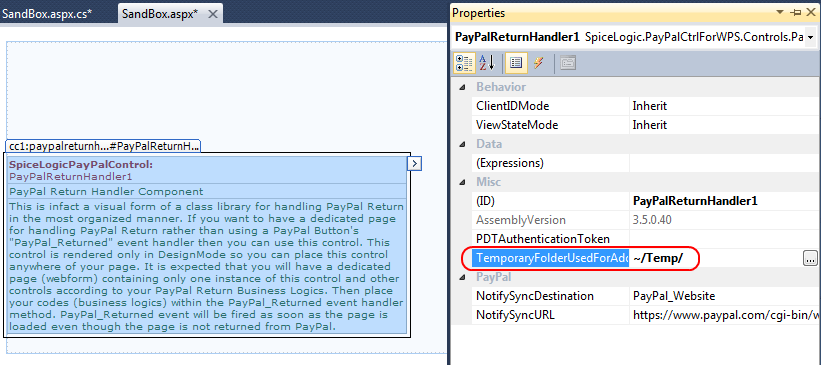
But if you changed that path and if you want access the additional data
items from a Dedicated 'PayPal Return Handler' component, then, you need to change
the property 'TemporaryFolderUsedForAdditionalDataItems' as well as
shown below:
Payment Data Transfer:
If you are not satisfied only with the transaction id, rather you want the all the transaction data, you can get that by activating Payment Data Transfer. Payment Data Transfer (PDT) is a secure method to retrieve the details about a PayPal transaction so that you can display them to your customer who are redirected back to your site upon payment completion.
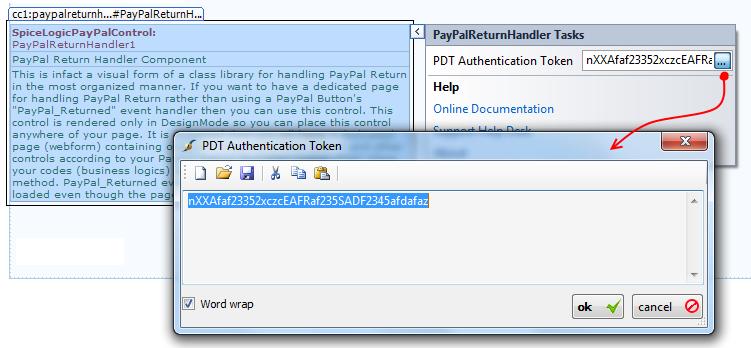
PDT Authentication Token:
When you activate PDT, you will get an identification token named "PDT authentication token". It is a string value that identifies your account to PayPal. If you want to handle PDT using this component, you must provide this token to the component. The following screen shot shows how you can do that in Design Time.
Once you have set the PDT Authentication Token, you are ready to use snippet like this:
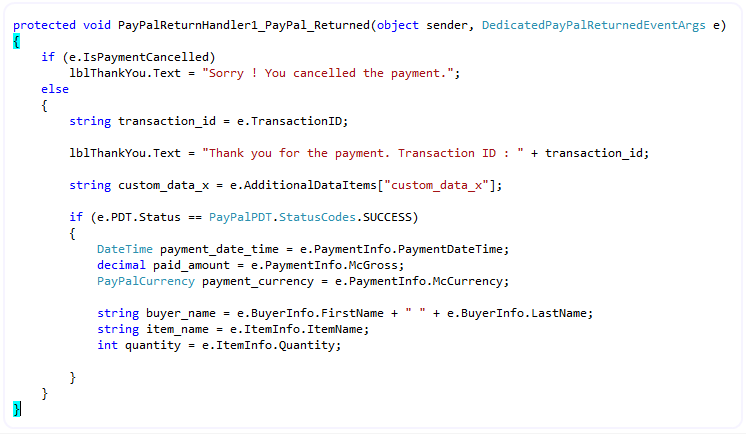

If the component does not find any PDT Token, e.PDT.Status will be set as "PayPalPDT.StatusCodes.NOT_Handling_PDT" and no transaction related data will be available except the Transaction ID.
A piece of advice : Never process
the post payment logic (i.e. logging the transaction data in your
database, verifying the payment and generating License Key, sending
email to the payer with shipping information etc) from PayPal_Returned
event even though you can collect all transaction data from PDT.
Because, if the payer closes his / her browser while living in PayPal
website before coming back to your website, then, PayPal_Returned event will never fire and so you will miss that transaction. Always use IPN for processing post payment logic. Use PayPal_Returned
event to convey 'Thank you' Message or doing some additional Read-Only
tasks. What is a Read Only task ? Read Only task means, "the task that
can be done by reading your database without writing / updating the
database". Get the Transaction-ID from the PayPal_Returned event, query your database using that Transaction-ID and find out if any information is already recorded by IPN event. If found, show the download link / shipping information etc from your database.
In order to use PDT, you must have Full Trust configuration in your ASP.NET website, otherwise you will always get e.PDT.Status = PayPalPDT.StatusCodes.Communication_Error from PayPal_Returned event. Because, prior to firing PayPal_Returned event, the control communicates with PayPal website in the background to verify the transaction using a method from WebClient class. Web Client class methods require Full Trust configuration. If you do not have full trust configuration, you cannot use the PDT feature even manually coding by yourself or using any other technique at all.
PDT Authentication Token property value will not be persisted in ViewState as it is a sensitive data. You can set PDT Token from Design Mode (persisted in ASPX markup). You can also set it programmatically from Page_Load event. But, if you set this value from a Post-back event (i.e. Click event) then, you will get unexpected result.
If you are testing in SandBox, you should change the property 'NotifySyncDestination = PayPal_Sandbox'. Otherwise, you will always get PDT Status = FAIL. But if you did not set the License Key (Trial Mode) then, no matter what value you set for this property, this component will always use NotifySyncDestination = PayPal_Sandbox.